
Views: 0 Author: Site Editor Publish Time: 2025-05-21 Origin: Site


Drilling through porcelain can be tricky. Its hardness and brittleness make it prone to cracking when not done properly. Choosing the right tools and techniques is crucial to avoid damaging your tiles. In this post, you’ll learn about the best porcelain tile drill bits and expert tips for drilling through porcelain without cracking it.

Drilling through porcelain tiles isn’t as simple as it seems. Porcelain is hard and brittle, making it vulnerable to cracks or chips if not drilled properly. If you don’t use the right tools or techniques, you risk damaging the tiles.
Porcelain tiles are incredibly dense and have a smooth, hard surface. This makes drilling through them a challenge, as the pressure from a regular drill bit can cause cracks or chips to form. It’s important to take your time and use the right methods to avoid damage.
Without proper tools, the risk of damaging your tile increases. A poor drilling technique, like too much pressure or speed, can cause porcelain to crack. Even a slight misstep can result in visible chips along the edges.
Porcelain is known for its brittleness. When too much pressure is applied during drilling, the material can easily fracture. It's crucial to maintain consistent speed and apply just enough pressure to get through the tile without putting undue stress on it.
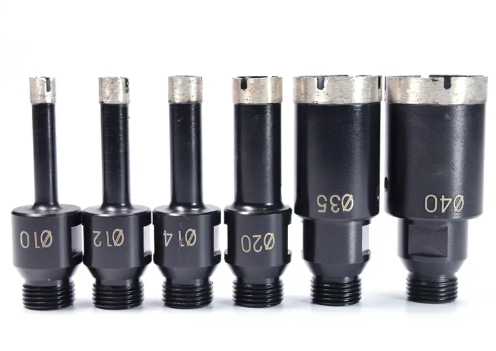
When drilling through porcelain, the right tools make all the difference. Using the wrong drill bit can result in cracks or chips. To drill porcelain safely, it’s essential to choose a drill bit designed for this hard, brittle material.
A porcelain tile drill bit is specifically designed to handle the tough surface of porcelain tiles. Unlike regular drill bits, these bits are made to prevent cracking and provide a clean, smooth hole. They feature specialized coatings and designs to handle the demands of drilling through porcelain.
There are several types of drill bits that work well with porcelain:
● Vacuum Brazed Drill Bits: These bits use diamond particles that are brazed to the bit using high temperatures. They are effective for dry drilling and are known for their durability.
● Sintered Crown Drill Bits: These bits are made with a crown-like design that helps distribute pressure evenly across the surface. They are often used for wet drilling and are effective at reducing cracks.
● Diamond Core Bits: These bits are ideal for creating larger holes and are coated with industrial-grade diamonds. They are perfect for high-density materials like porcelain and can handle wet and dry drilling.
Regular drill bits are not designed to cut through hard materials like porcelain. They lack the strength and durability needed to handle the tile’s density. Standard bits can cause excessive heat, pressure, and friction, resulting in cracks or shattered tiles.
Porcelain is one of the hardest materials, so using diamond-coated drill bits is crucial. These bits have a diamond coating that helps cut through the tile’s tough surface without creating heat build-up. Diamond-coated bits also last longer and provide cleaner, more precise holes.
Before you start drilling through porcelain tiles, proper preparation is key to a successful project. Following the right steps helps avoid errors like misalignment or cracks. Here's how to get ready for drilling and ensure the process goes smoothly.
Marking the drilling area accurately is essential. A small mistake in positioning can lead to misalignment or an incorrect hole. Use a pencil or a fine marker to clearly mark the spot where you plan to drill. Make sure the markings are visible but not too deep to avoid damaging the surface.
To prevent the drill bit from slipping, it’s important to get a firm grip on the porcelain surface. You can create a small indentation by tapping the marked spot gently with a hammer and a small nail or drill bit. This indentation serves as a guide for the drill bit, preventing it from slipping as you begin drilling.
One effective way to keep the tile in place is by using the cross tape technique. Place a piece of painter’s tape or masking tape over the marked area, ensuring it covers the tile’s surface completely. Apply a second layer of tape perpendicular to the first, creating a cross. This will reduce the risk of the tile shifting or breaking while you drill.
Pre-drilling is a crucial step when working with porcelain tiles. By creating a small guide hole first, you reduce the pressure and stress on the tile. This helps ensure that the larger drill bit doesn’t crack the surface or cause chips along the edges.
Starting with a small guide hole allows the larger drill bit to follow a clear path, reducing the chance of the tile cracking. It also helps you maintain better control over the drilling process. A properly drilled guide hole sets the foundation for accurate and safe drilling.
For best results, start with a guide hole that’s about 1/8” to 1/4” in diameter. This size will allow the larger drill bit to enter smoothly. Once the guide hole is made, you can gradually use larger bits to create the desired hole size without risking tile damage.

Drilling through porcelain tiles can seem tricky, but following the right steps ensures a smooth, crack-free hole. Here’s a step-by-step guide to drilling porcelain tiles without causing damage.
Properly positioning the tile is the first crucial step. Use a pencil or fine marker to clearly mark the spot where you want to drill. Make sure the mark is accurate, as any misalignment can lead to cracking.
To prevent the tile from shifting during drilling, use the cross tape technique. Place a piece of painter’s tape or masking tape over the marked area. Apply a second layer of tape perpendicular to the first, creating a cross pattern. This helps secure the tile and reduces stress, minimizing the risk of damage.
Starting at low speed is vital to prevent cracking. Set your drill speed to 200-500 RPM. This slow speed helps prevent the drill bit from generating too much heat or pressure, which can lead to cracks in the porcelain glaze.
Once the drill bit has penetrated the glaze, you can gradually increase the speed. Keep the pressure light—ideally no more than 5kg. Applying too much pressure can crack or chip the tile.
Speed and Pressure Control Tips from Zhuoshi’s Testing:
● Starting slow (200-500 RPM) is essential, especially when working with hard materials like porcelain or Dekton.
● Keeping pressure below 5kg helps avoid cracking. Tests show that using 10kg of pressure increases the crack rate by four times compared to using the recommended pressure.
Cooling the drill bit is crucial to avoid overheating, which can cause thermal damage to both the bit and the tile. There are two main methods: dry drilling and wet drilling.
● Dry Drilling: For smaller holes (5-14mm), you can use drill bits with self-cooling wax. This cooling system helps maintain the temperature of the drill bit below 60°C.
● Wet Drilling: For larger holes (>14mm), use water cooling. Spray water on the drill bit, keeping the water temperature below 30°C. This prevents the drill bit from overheating and helps reduce cracking risk.
Start drilling at a slow pace to carefully go through the tile's glaze. Once you’ve broken through the surface, you can increase the speed. Keep in mind that faster drilling is possible after penetrating the glaze, but always make sure to use the cooling methods mentioned earlier to keep the drill bit and the tile at optimal temperatures.
If you’re drilling larger holes (e.g., 68mm), it’s crucial to use specialized drill bits designed for such tasks. These bits often come with cooling mechanisms to ensure precise, clean cuts through hard materials like porcelain.
Drilling porcelain tiles can be tricky, especially if you're not using the right methods. Here are some common mistakes that can lead to cracks, chips, or even ruined tiles.
One of the most common mistakes is using a general-purpose drill bit. Standard drill bits are not designed to handle the hardness and brittleness of porcelain tiles. Using the wrong bit can lead to cracks or chips in your tiles.
When drilling porcelain, always opt for a porcelain tile drill bit. These bits are specifically made for hard materials like porcelain and Dekton. Diamond-coated drill bits, such as vacuum brazed or sintered crown bits, are excellent choices. They reduce cracking and extend the life of your tools, ensuring smoother, cleaner holes.
Another mistake is drilling too quickly or applying too much pressure. Porcelain is dense and brittle, so high-speed drilling or excessive pressure can cause the tile to crack or shatter.
It’s essential to control the speed and pressure of your drill to avoid damaging the tile. Start with a low speed (200-500 RPM) and increase the speed only once you’ve penetrated the surface. Keep the pressure light—no more than 5kg.
Pressure and Speed Test Results: Zhuoshi’s lab tests show that drilling too quickly or using excessive pressure increases the crack rate by 3-4 times compared to following the recommended guidelines. So, take your time, maintain control, and avoid rushing through the job.
Not all porcelain tiles are the same, and drilling through them can require different techniques based on the tile's composition and surface. Here’s how to handle the most common types of porcelain tiles.
When drilling through regular porcelain tiles, it's important to keep the process simple and controlled. These tiles are less dense compared to high-end tiles like Dekton, but they still require care.
● Recommended Drilling Speed: Use a speed of 300-500 RPM for best results. This helps prevent cracking by reducing heat buildup.
● Pressure: Apply light pressure to avoid stressing the tile. Too much force can cause cracks.
Dekton is a high-density, ultra-hard material that requires extra care during drilling. Regular porcelain bits will not cut through it efficiently, so you need specialized tools.
● Recommended Drill Bits: Use sintered crown drill bits or high-quality diamond-coated bits for best results.
● Method: Start with a slow feed rate of 0.05mm/s for the first 5mm. Increase it slightly to 0.1mm/s as you drill further.
● Cooling: Wet drilling is highly recommended. Use water cooling to maintain a safe temperature and avoid overheating the bit and tile.
Dekton Drilling Tips:
● Always use a sintered crown drill bit.
● Apply slow and steady pressure.
● Ensure proper water cooling to prevent cracks.
Glazed porcelain is more delicate than regular porcelain, and the glaze can easily chip or crack if not handled carefully.
● Extra Care: The glaze needs extra attention to avoid chipping. Start the drilling process slowly to reduce the stress on the surface.
● Techniques: Use a diamond-coated drill bit and start drilling at a very slow speed. Keep the pressure minimal to preserve the glaze’s integrity.
● Cooling: For best results, use wet drilling with a continuous water flow to prevent heat buildup and preserve the glaze.
When drilling through glazed porcelain, always prioritize precision and slow speeds. The goal is to minimize the impact on the surface and ensure a smooth, clean hole.
For larger or more complex porcelain tile projects, advanced drilling techniques and equipment are essential. Professional use often requires more precision and tailored tools to achieve the best results.
CNC (Computer Numerical Control) machines are ideal for large-scale porcelain tile drilling. They provide precision and control, making them perfect for intricate or bulk projects. CNC machines can consistently create precise holes without the risk of cracks or chips, making them invaluable for professional use.
● Why CNC Equipment is Ideal: CNC equipment is designed for high-precision tasks, particularly useful when drilling porcelain tiles in large quantities. The accuracy of CNC machines ensures minimal material waste and consistent results.
● Matching the Correct Drill Bit: When using CNC equipment, it’s crucial to match the drill bit to the machine settings. Common configurations include M14 thread bits and slow feed rates to ensure that the bit moves at an optimal pace for porcelain tiles.
CNC Settings and Drill Bit Compatibility:
● The machine’s feed rate should be kept slow to prevent cracking.
● M14 thread drill bits are commonly used for precise drilling.
● Adjusting the CNC machine’s speed to match the tile’s hardness prevents overheating and cracking.
In some cases, porcelain tiles require custom drill bits. These custom tools are designed to handle specific tile types, including unique shapes, colors, or densities.
● Availability of Custom Tools: Professional services can provide specialized drill bits tailored for specific tile types, such as RAL color-matched bits or curved designs for non-standard tile shapes.
● How Custom Drill Bits Help: Custom bits are perfect for hard-to-drill porcelain tiles or complex designs. These bits are made to enhance drilling efficiency and precision, ensuring that tiles remain intact throughout the drilling process.
Custom Drill Bit Advantages:
● Customized bits offer longer tool life and better performance, especially for specialized materials.
● They reduce the risk of damage to delicate or unique tile surfaces, making them ideal for high-end projects or specialized designs.
Once you’ve successfully drilled through your porcelain tile, the next step is to handle the tile carefully to ensure that the hole remains clean and crack-free. Proper aftercare helps preserve the tile’s integrity and ensures your project looks professional.
After drilling, avoid placing stress on the tile. Pick it up carefully by the edges to prevent putting pressure on the freshly drilled hole. This helps avoid any accidental cracks or fractures from forming around the hole.
The edges of the drilled hole can be sharp or rough, so it’s important to smooth them out. Use a diamond polishing pad or a resin polishing tool to gently smooth the edges of the hole. This not only ensures a clean, neat finish but also reduces the risk of small fractures or chips forming around the hole.
After drilling, debris from the tile can accumulate around the hole. Use a soft cloth or a small brush to clean up the area. Be gentle to avoid disturbing the hole or damaging the surface. If needed, wipe the area with a damp cloth to remove any dust or particles left behind from the drilling process.
After cleaning, visually inspect the drilled hole for any signs of cracks. A magnifying glass or flashlight can help you spot small fractures that may not be visible to the naked eye.
● How to Visually Inspect for Cracks: Look closely around the edge of the hole. Cracks might appear as fine lines or hairline fractures, especially around the hole’s perimeter. If you notice any, it’s important to assess the damage before proceeding with further work.
If you spot hairline fractures, avoid applying pressure to the area. You can try filling the cracks with a tile repair resin or adhesive designed for porcelain. Alternatively, if the fractures are significant, it might be best to replace the tile to prevent future damage.
Drilling through porcelain tiles requires the right tools and techniques to prevent damage. Using a porcelain tile drill bit, maintaining the correct speed, and applying cooling methods are key to achieving crack-free results. Always choose high-quality drill bits to ensure precision and longevity. Following these tips will help you achieve professional-level results without damaging your tiles.
A: No, standard drill bits aren’t designed for hard materials like porcelain. They can cause cracks or chips. Always use a porcelain tile drill bit to prevent damage.
A: Recommended speeds are 200-500 RPM. Too fast can cause heat buildup, leading to cracks. Start slow and increase speed once you break through the glaze.
A: Look for diamond-coated bits designed for porcelain. These are ideal for cutting through dense, brittle materials like porcelain tiles.
A: Yes, by using the correct drill bit, starting with a small guide hole, and applying minimal pressure, you can drill through porcelain safely.
A: The lifespan varies. Diamond-coated bits last longer, especially with porcelain. Replace them when they show signs of wear or after drilling about 50 holes.

